-
How to determine the installed .NET Framework, .NET Core, and Functions Runtime versions in Azure App Services posted on 30 Aug 2018
I was looking to see which versions of the .NET Framework, .NET Core, and the Functions Runtime were installed in Azure App Service and came across Jeff Sanders' post from 2016 on the topic but it was missing details for .NET Core and Functions, so I decided to write up a single post that covers all three.
First steps
The first thing we need to do is to open the Kudu Debug Console.
To do that, navigate to
{yoursite}.scm.azurewebsites.netand then click on "Debug console" at the top. You can select either CMD or PowerShell.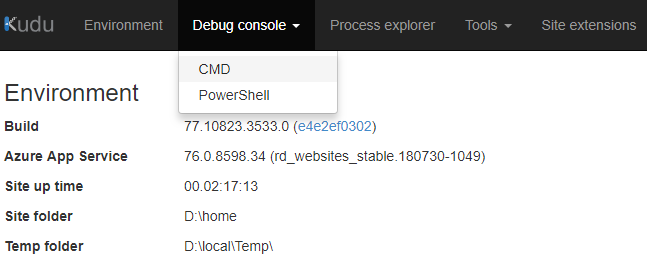
Now that we have the console open...
.NET Framework
To find out the installed .NET Framework versions, type:
ls "\Program Files (x86)\Reference Assemblies\Microsoft\Framework\.NETFramework"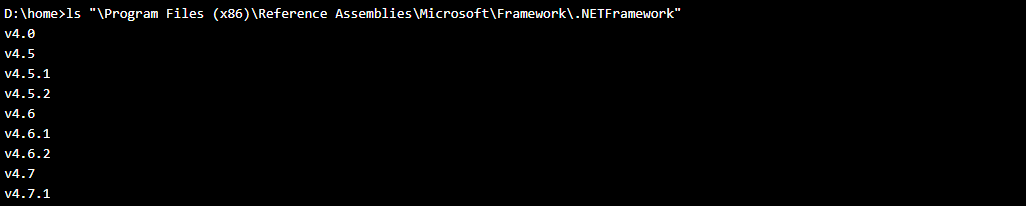
ls -landdiralso work in place ofls, we're just listing the contents of the folder..NET Core
For .NET Core, you have two options:
You can use the
dotnet --infocommand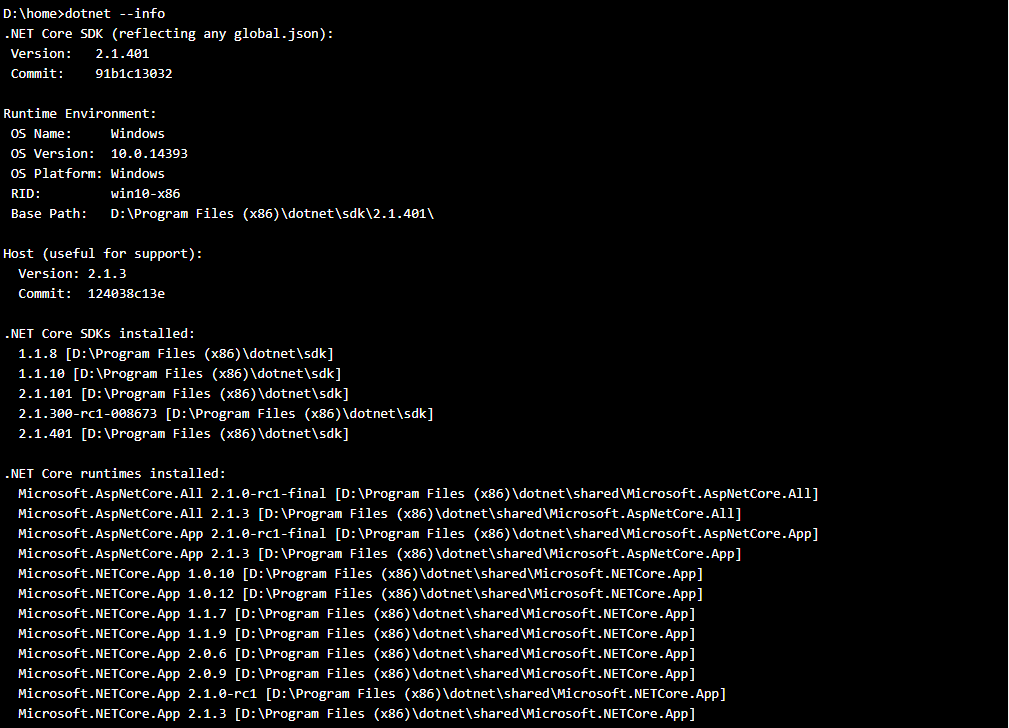
Or you can type:
ls "\Program Files (x86)\dotnet\shared\Microsoft.NETCore.App"
Functions Runtime
For the installed Azure Functions Runtime versions, type:
ls "\Program Files (x86)\SiteExtensions\Functions"
The Kudu console supports pasting via Control-V for the commands above.
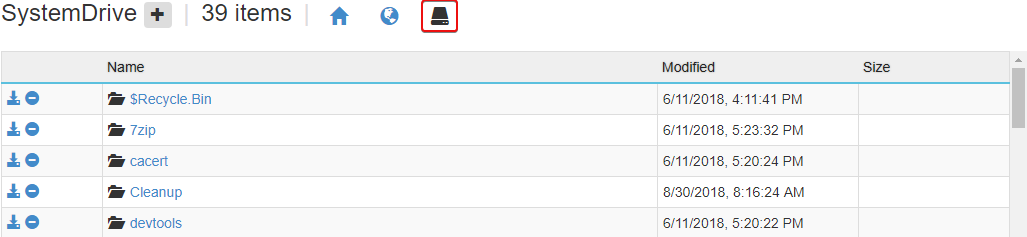
You can also select the "System Drive" icon in the file browser section at the top of the page and then navigate to the respective folders by clicking the folder links. Using the file browser will automatically change the current working directory in the console.
-
Enable Schema Validation and Required Fields for JSON in Azure Logic Apps posted on 27 Aug 2018
Logic Apps is pretty accommodating about the format of the json you supply to an HTTP trigger and doesn't by default warn you when it doesn't match the schema you've specified.
Here's how to enable schema validation and additionally specify required properties in that json schema to help you more easily catch issues in your input data.
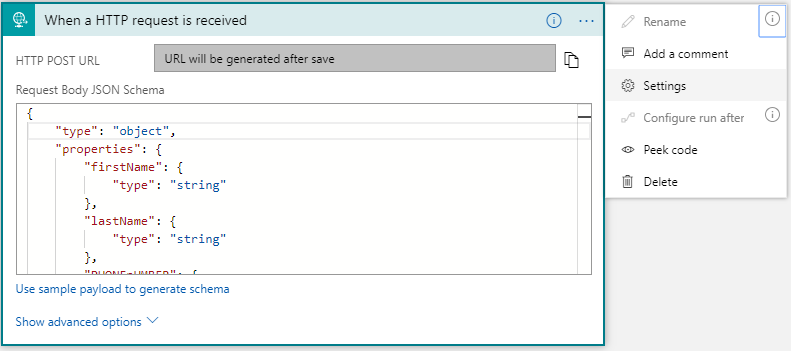
- Open the settings for the HTTP Trigger (click the ellipsis to open the menu):
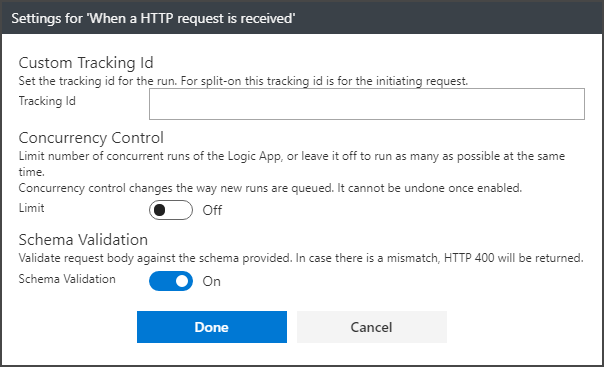
- Toggle on Schema Validation (it's off by default):
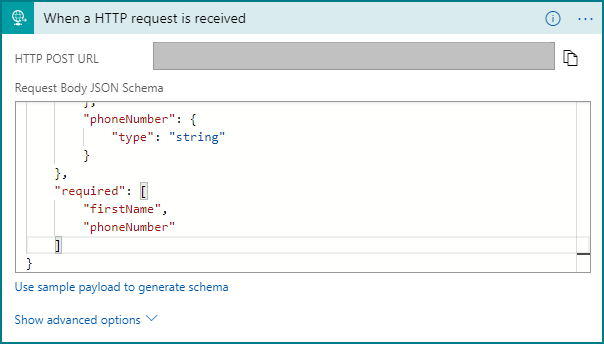
- Add a "required" array after the property definition segment of the json schema and specify which properties should always be present in the json input:
By default json properties are treated as nullable, so it's the combination of enabling schema validation and specifying the required values that can quickly help you pinpoint issues with input data that isn't formatted like you're expecting.
The required properties setting can be used on any action that lets you specify the schema of the JSON you're working with, a good example being the Parse JSON action.
If you're unfamiliar with how to create a JSON Schema for use in Logic Apps, you can create one quickly using the "Use sample payload to generate schema" link on the Logic Apps actions that accept JSON input, but for a more in depth walk through, Michael Crump has a good post here: https://www.michaelcrump.net/azure-tips-and-tricks38/
-
Free Xamarin University Resources posted on 29 Nov 2016
Xamarin University offers a wealth of training materials across a broad range of subjects with live instructor led courses, self guided training, guest lectures, and more.
Many of the introductory materials are available for free or included with other programs and I wanted to capture links to them here so people can get started even if they're not yet ready to pull the trigger on a full Xamarin University subscription.
Self-Guided Lessons & Free Trial
You can access many self-guided lessons from Xamarin University for free by visiting https://university.xamarin.com/self-guided and creating a Xamarin account (or signing in with an existing one).
These self-guided lessons include videos, exercises, quizzes, and earn you credit towards becoming a Xamarin Certified mobile developer.
If this is your first time signing in to Xamarin University, this will also start a free trial that includes 30 days of access to Xamarin University's Guest Lectures and two live instructor led courses in addition to the self-guided lessons.
Dev Essentials & Visual Studio Subscribers
If you are a Visual Studio Dev Essentials program member or Visual Studio subscriber (formerly MSDN), you have access to additional course content in Xamarin University above and beyond the self guided lessons.
Visit the My Visual Studio portal and log in to activate your Xamarin University benefits.
On-Demand Videos
Lightning Lectures
Xamarin University's Lightning Lectures are available for anyone to watch without a Xamarin account and are short, focused sessions that cover a variety of common challenges, tools, and topics around mobile development.
Connect(); // 2016
As part of the Connect(); //2016 event, six on demand videos were published by Xamarin University. These videos are available on Xamarin University, Channel 9, and YouTube.
The training materials for these sessions can be found on GitHub.
Module #1 - Introduction to Xamarin Platform (Rob Gibbens)
This session provides a quick introduction to the Xamarin tools for Visual Studio. It will show you what you need to develop, debug, deploy and publish applications for iOS and Android using Visual Studio 2015 or Visual Studio 2017 RC with the Xamarin tools installed.
Watch on Channel 9 | Watch on YouTube
Module #2 - Introduction to Xamarin.Forms (Renè Ruppert)
In this session, we will dive into Xamarin.Forms, a cross-platform UI framework that allows you to create native UIs for iOS, Android and Windows with shared code. By the end of this session, you will have a good understanding of how Xamarin.Forms works, how to design basic pages, and how to share code with Portal Class Libraries or Shared Projects. Finally, we will begin a new project – a Trivia app, which will be completed throughout the remainder of the sessions.
Watch on Channel 9 | Watch on YouTube
Module #3 - XAML Fundamentals (Jesse Dietrichson)
Xamarin.Forms supports the use of the XAML markup language to design your UI. In this session, we will cover the basics of the XAML language, design a few more screens for our trivia application, and explore some best practices when using XAML with your mobile applications and Xamarin.Forms.
Watch on Channel 9 | Watch on YouTube
Module #4 - Adding Azure Web Services (Jason DeBoever)
Now that the main pieces of the trivia application are in place, we will explore adding a server backend to our mobile application using Azure App services. This session will show you how quick and easy it is to add a cloud-based database which is synchronized to your application, allowing you to change the data that drives your application without publishing a new version of the application each time.
Watch on Channel 9 | Watch on YouTube
Module #5 - UITesting (Glenn Stephens)
We all know that we need to test our applications thoroughly to ensure quality – and this is particularly important in the mobile world where a few bad reviews can kill your sales on the various app stores! In this session, we will test our trivia application using Xamarin.UITest and Xamarin TestCloud. These tools allow you to define the behavior of your application and then automate the application on simulators and physical devices to validate the expected behavior. To ensure we try our app on every possible variation, we will push our tests up to the cloud where we can run it across hundreds of real devices and get back a comprehensive report of any failures.
Watch on Channel 9 | Watch on YouTube
Module #6 - Distributing your application and collecting information (Kym Phillpotts)
In this final session, we will get ready to distribute our trivia application to the world – starting with some beta testers. We will look at two different systems – first, HockeyApp which allows us to monitor and collect runtime analytics from our application as it runs on all our beta testers devices. Then, we will take a quick look at Visual Studio Mobile Center, announced at Connect(); which brings a lot of the mobile platform systems we looked at over the course of the day together.
Watch on Channel 9 | Watch on YouTube
Full Subscriptions
Once you're ready, you can purchase a full subscription to Xamarin University that includes unlimited live online instructor led training, 1-on-1 office hours with instructors, unlimited access to recorded class videos, self-guided lessons, class labs and training materials, and the Xamarin certification exam.
The complete course catalog contains over 70 classes across 8 different tracks ranging from beginner level C# to advanced enterprise security in mobile applications.
Visit https://www.xamarin.com/university for more information on purchasing.
-
INotifyPropertyChanged, The .NET 4.6 Way posted on 12 Sep 2015
This article is part of a series:
- INotifyPropertyChanged, The Anders Hejlsberg Way
- INotifyPropertyChanged, The .NET 4.5 Way
- INotifyPropertyChanged, The .NET 4.5 Way - Revisited
- INotifyPropertyChanged, The .NET 4.6 Way
With the release of Visual Studio 2015 & .NET 4.6, we have a new version of the C# compiler and along with it a new version of C# [version 6] that includes new language features that we can leverage to improve the implementation of
INotifyPropertyChangedin our applications.Specifically, with the addition of the Null-conditional Operators in C# 6, we can simplify the implementation of our
OnPropertyChangedmethod from:protected void OnPropertyChanged([CallerMemberName] string propertyName = null) { PropertyChangedEventHandler eventHandler = this.PropertyChanged; if (eventHandler != null) { eventHandler(this, new PropertyChangedEventArgs(propertyName)); } }to:
protected void OnPropertyChanged([CallerMemberName] string propertyName = null)
{
    this.PropertyChanged?.Invoke(this, new PropertyChangedEventArgs(propertyName));
}
This works because the new Null-conditional Operators are thread-safe:
Another use for the null-condition member access is invoking delegates in a thread-safe way with much less code. ... The new way is thread-safe because the compiler generates code to evaluate PropertyChanged one time only, keeping the result in a temporary variable.
While the
CallerMemberNameattribute in ourOnPropertyChangedmethod implementation will handle most cases, when we do need to manually specify the name of a property in C# 6, we no longer need to resort to the use of magic strings or expression trees. Rather, we can now use the newnameof()operator keyword to pass the property name:OnPropertyChanged(nameof(MyProperty));These changes have the added bonus of being usable when you're targeting prior versions of .NET as well (though you must have the .NET 4.6 tooling installed). This means we don't have to update our existing applications and libraries to .NET 4.6 just the take advantage of the new language features.
The code in this post, except for the
CallerMemberNameattribute, works in Visual Studio 2015 when targeting framework versions all the way down to .NET 2.0. The use of theCallerMemberNameattribute requires a target of .NET 4.5 or higher.Using these features, our implementation of the BindableBase class now looks like this:
using System.ComponentModel;
using System.Runtime.CompilerServices;

/// <summary>
///     Implementation of <see cref="INotifyPropertyChanged" /> to simplify models.
/// </summary>
public abstract class BindableBase : INotifyPropertyChanged
{
    /// <summary>
    ///     Multicast event for property change notifications.
    /// </summary>
    public event PropertyChangedEventHandler PropertyChanged;

    /// <summary>
    ///     Checks if a property already matches a desired value.  Sets the property and
    ///     notifies listeners only when necessary.
    /// </summary>
    /// <typeparam name="T">Type of the property.</typeparam>
    /// <param name="storage">Reference to a property with both getter and setter.</param>
    /// <param name="value">Desired value for the property.</param>
    /// <param name="propertyName">
    ///     Name of the property used to notify listeners.  This
    ///     value is optional and can be provided automatically when invoked from compilers that
    ///     support CallerMemberName.
    /// </param>
    /// <returns>
    ///     True if the value was changed, false if the existing value matched the
    ///     desired value.
    /// </returns>
    protected bool SetProperty<T>(ref T storage, T value, [CallerMemberName] string propertyName = null)
    {
        if (Equals(storage, value))
        {
            return false;
        }

        storage = value;
        this.OnPropertyChanged(propertyName);
        return true;
    }

    /// <summary>
    ///     Notifies listeners that a property value has changed.
    /// </summary>
    /// <param name="propertyName">
    ///     Name of the property used to notify listeners.  This
    ///     value is optional and can be provided automatically when invoked from compilers
    ///     that support <see cref="CallerMemberNameAttribute" />.
    /// </param>
    protected void OnPropertyChanged([CallerMemberName] string propertyName = null)
    {
        this.PropertyChanged?.Invoke(this, new PropertyChangedEventArgs(propertyName));
    }
}
Null-conditional Operators and the
nameof()operator are both fantastic new additions. While you're taking advantage of them, don't forget to familiarize yourself with all of the new language features in C# 6.Bonus: If you wanted to implement BindableBase while targeting .NET 2.0 to .NET 4.0, it would look like this.
-
Supported PCL Profiles in Xamarin for Visual Studio posted on 14 May 2014
2016/06/09 Update:
As of the Xamarin 4.1 release two new profiles were added:
Profile 44	(.NET Framework 4.5.1, Windows 8.1) (netstandard 1.2)
Profile 151	(.NET Framework 4.5.1, Windows 8.1, Windows Phone 8.1) (netstandard 1.2)
My Profile Notes page has been updated with the details of these new profiles.
Original Post:
Xamarin is continuing their rapid development pace and has released several updates to their Xamarin for Visual Studio tools since my last post on PCL Profiles & Xamarin.
Most notably, if you're on the Alpha or Beta channel, they have released a 2.0 build of Xamarin for Visual Studio which unifies the iOS and Android installers into a single package and adds support for several new PCL profiles.
Here are all of the currently supported PCL profiles in the 2.0 release (No SupportedFramework Fix required):
Profile 5   (.NET Framework 4,     Windows 8)
Profile 6   (.NET Framework 4.0.3, Windows 8)
Profile 7   (.NET Framework 4.5,   Windows 8) (netstandard 1.1)
Profile 14  (.NET Framework 4,     Silverlight 5)
Profile 19  (.NET Framework 4.0.3, Silverlight 5)
Profile 24  (.NET Framework 4.5,   Silverlight 5)
Profile 37  (.NET Framework 4,     Silverlight 5, Windows 8)
Profile 42  (.NET Framework 4.0.3, Silverlight 5, Windows 8)
Profile 47  (.NET Framework 4.5,   Silverlight 5, Windows 8)
Profile 49  (.NET Framework 4.5,   Windows Phone Silverlight 8) (netstandard 1.0)
Profile 78  (.NET Framework 4.5,   Windows 8, Windows Phone Silverlight 8) (netstandard 1.0)
Profile 92  (.NET Framework 4,     Windows 8, Windows Phone 8.1)
Profile 102 (.NET Framework 4.0.3, Windows 8, Windows Phone 8.1)
Profile 111 (.NET Framework 4.5,   Windows 8, Windows Phone 8.1) (netstandard 1.1)
Profile 136 (.NET Framework 4,     Silverlight 5, Windows 8, Windows Phone Silverlight 8)
Profile 147 (.NET Framework 4.0.3, Silverlight 5, Windows 8, Windows Phone Silverlight 8)
Profile 158 (.NET Framework 4.5,   Silverlight 5, Windows 8, Windows Phone Silverlight 8)
Profile 225 (.NET Framework 4,     Silverlight 5, Windows 8, Windows Phone 8.1)
Profile 255 (.NET Framework 4.5,   Silverlight 5, Windows 8, Windows Phone 8.1)
Profile 259 (.NET Framework 4.5,   Windows 8, Windows Phone 8.1, Windows Phone Silverlight 8)
Profile 328 (.NET Framework 4,     Silverlight 5, Windows 8, Windows Phone 8.1, Windows Phone Silverlight 8) (netstandard 1.0)
Profile 336 (.NET Framework 4.0.3, Silverlight 5, Windows 8, Windows Phone 8.1, Windows Phone Silverlight 8)
Profile 344 (.NET Framework 4.5,   Silverlight 5, Windows 8, Windows Phone 8.1, Windows Phone Silverlight 8)
Now what profile should you choose?
My advice:
- If you're starting a brand new cross platform mobile .NET app today and looking to use a PCL for common code in your app, you should probably use Profile 111 as it offers access to a lot of APIs not available in the other profiles.
- If you're creating a library for consumption by a broad range of existing cross platform mobile .NET applications, you should look at Profile 259 as it has broad reach and access to .NET 4.5 functionality.
If you're looking for a complete list of all PCL profiles, take a look at this great reference created by Stephen Cleary.

I'm Dan Rigby and this is my blog. Here you will mostly find development related things.
Xamarin & Windows App Developer Link Archive: links.danrigby.com